Thursday, August 6, 2015

Spring Dependency Injection / Inversion of Control (IoC)

INTRODUCTION

  • Spring Framework's very basic concept is Dependency Injection or IoC.
  • It is a reverse process of traditional java object initialization and instantiation.
  • When a java program starts running it, it will first create all the dependent object and then start executing even though those objects are used or not.
  • But Spring Framework's Dependency Injection will reverse the process of creating the object for any Class.
  • It will create the object whenever it is required at run-time.

SOFTWARES & TOOLS

  1. Eclipse IDE (Mars2) with Spring Plugins Installed.
  2. Java 1.6

USECASE

I would like to explain with a simple program which will read the data from different sources (flat file, db or from other sources)

IMPLEMENTATION

STEP 1

Create an interface for file reading.
package com.jbr.springcore.ioc;

public interface DataReader {
 String readData();
 String getSource();
}

STEP 2

Create an implementation for flat file reading.
package com.jbr.springcore.ioc;

import java.io.File;
import java.io.FileNotFoundException;

import java.util.Scanner;

public class FlatFileDataReader implements DataReader {
 private StringBuilder builder;
 private Scanner scanner;

 public FlatFileDataReader(String fileName) throws FileNotFoundException {
   scanner = new Scanner(new File(fileName));
   builder = new StringBuilder();
 }

 @Override
 public String readData() {
   while (scanner.hasNext()) {
     builder.append(scanner.next() + " ");
   }

   return builder.toString();
 }

 private String source;

 public void setSource(String source) {
   this.source = source;
 }

 public String getSource() {
   return source;
 }
}

STEP 3

Create service class.
package com.jbr.springcore.ioc;

public class DataReaderService {

 private DataReader dataReader;

 public DataReaderService(DataReader dataReader) {
   this.dataReader = dataReader;
 }

 public String readData() {
   return dataReader.readData();
 }

 public String getSource() {
   return dataReader.getSource();
 }
}

Now your bean is ready, configure it in bean configuration file.

STEP 4

Create Bean Configuration file & Properties file

  • This file will contain one or more bean configurations which will be used in your application
  • Changing the hardcoded values in the bean configuration file is a hectic job. So that I have created a property file with a list of properties and configured in bean configuration file.
<?xml version="1.0" encoding="UTF-8"?>
<beans xmlns="http://www.springframework.org/schema/beans"
xmlns:xsi="http://www.w3.org/2001/XMLSchema-instance"
xsi:schemaLocation="http://www.springframework.org/schema/beans http://www.springframework.org/schema/beans/spring-beans.xsd">

<bean id="placeholderConfig"
class="org.springframework.beans.factory.config.PropertyPlaceholderConfigurer">
<property name="location" value="classpath:application.properties"></property>
</bean>

<bean id="dataReaderService" class="com.jbr.springcore.ioc.DataReaderService">
<constructor-arg ref="flatFileReader" />
</bean>

<bean id="flatFileReader" class="com.jbr.springcore.ioc.FlatFileDataReader">
<constructor-arg value="${fileName}" />
<property name="source" value="${dataSource}"></property>
</bean>

</beans>

STEP 5

Create a properties file to have necessary property.
fileName=data.txt
dataSource=Data From Flat File

STEP 6

Create a client program to read the data from the file.
package com.jbr.springcore.ioc;

import org.springframework.context.ApplicationContext;
import org.springframework.context.support.ClassPathXmlApplicationContext;

public class DataReaderMain {

 ApplicationContext applicationContext;
 DataReaderService dataReaderService;

 public DataReaderMain() {
   applicationContext = new ClassPathXmlApplicationContext("ioc-beans.xml");
   dataReaderService = (DataReaderService) applicationContext.getBean("dataReaderService");
 }

 public String getData() {
   return dataReaderService.readData();
 }

 public String getSource() {
   return dataReaderService.getSource();
 }

 public static void main(String[] args) throws Exception {
   DataReaderMain dataReaderMain = new DataReaderMain();
   System.out.println("Data Source: " + dataReaderMain.getSource());
   System.out.println("Data: " + dataReaderMain.getData());
 }
}

INPUT

Create a file and have some data like below.
This is a sample spring program

OUTPUT


Data Source: Data From Flat File
Data: This is a sample spring program

Further, if you want to read data from a database, write a separate class which will implement the DataReader Interface and configures it in the bean configuration.
Hope this post helps to understand the auto-wiring without annotation. I will cover the auto-wiring with annotation in another post.
Please share your comments and suggestions.
Happy Knowledge Sharing!!!

Tuesday, August 4, 2015

Python program in Eclipse

INTRODUCTION

Python

  • It is interactive, interpreted and object-oriented programming.
  • It contains modules, classes, exceptions.
  • Supports dynamic data types and dynamic data binding.
  • Supports imperative, functional and procedural type of programming.

SOFTWARES & TOOLS

  1. Eclipse (Mars2)
  2. Python

GOAL

  1. Instal Python
  2. Install Python Plugin in Eclipse
  3. Create & Run a Python Program

INSTALL PYTHON

  1. Download latest python software package from official Python website: https://www.python.org/ as per your system configuration (Windows/Linux)
  2. It is advisable to install it under c: directly.

INSTALL ECLIPSE PLUG-IN

  1. In Eclipse, go to Help -> Install New Software
    1. Name: Python
    2. Location: http://pydev.org/updates
  2. Click Next & Finish
  3. Go to Window->PyDev->Interpreters->Python Interpreter
  4. Click New Button at top right
    1. Interpreter Name: Python
    2. Interpreter Executable: C:\Python27\python.exe
  5. Click OK

CREATE & RUN A PYTHON PROGRAM

  1. Create a New PyDev->PyDev Project & Enter Name for the Project.
  2. Select Interpreter (Python) which we created earlier
  3. Click Finish.
  4. Select Python Perspective by Window->Open Perspective->PyDev
  5. Select the newly created project and create an src folder (if not found) by PyDev->&Source Folder
  6. Now create a new Python program file by PyDev->PyDev &Module
  7. Enter name (helloworld) and select Template as <Empty> just for now and click OK
  8. Now your first program is ready to code.
  9. Enter below code in helloworld.py and save
print "Hello World in Python!!"
  1. Now Right click, Run As->Python Run

OUTPUT


Hello World in Python!!

Tuesday, July 28, 2015

src/main/java and src/test/java not created in Eclipse Maven Project

ISSUE

When I tried to Create a Maven Project in Eclipse, I couldn't see src/main/java and src/test/java source folders.

SOLUTION

Follow the below steps to resolve the issue.

1. Right click the Maven Project -> Build Path -> Configure Build Path
2. In Order and Export tab, you can see the message like '2 build path entries are missing'
3. Now select 'JRE System Library' and 'Maven Dependencies' checkbox
4. Click OK

Now you can see below in all type of Explorers (Package or Project or Navigator)

src/main/java
src/main/resources
src/test/java

Tuesday, July 21, 2015

Different Ways of Looping the Map in Java

INTRODUCTION

There are multiple ways to loop through a Map and display the Key and Value. They are:
  1. Using EntrySet
  2. Using KeySet
  3. Using Iterator
  4. Using Map Values

Below example will provide different ways of looping the Map Keys and its values.

EXAMPLE

import java.util.Collection;
import java.util.HashMap;
import java.util.Iterator;
import java.util.Map;
import java.util.Map.Entry;
import java.util.Set;

public class LoopingMap {

 public static void main(String[] args) {

   Map<String, String> map = new HashMap<String, String>();
   map.put("1000", "Ranjith");
   map.put("2000", "Sekar");
   map.put("3000", "Bala");
   map.put("4000", "Kumar");
   map.put("5000", "Rekha");

   // Way 1: Using EntrySet
   System.out.println("===1. Using Map's EntrySet===");
   Set<Map.Entry<String, String>> entries = map.entrySet();
   for (Map.Entry<String, String> entry : entries) {
     System.out.println(entry.getKey() + " >> " + entry.getValue());
   }

   // Way 2: Using keySet
   System.out.println("\n===2. Using Map's KeySet===");
   Set<String> str = map.keySet();
   for (Object obj : str) {
     System.out.println(obj.toString() + " >> " + map.get(obj.toString()));
   }

   // Way 3: Using Iterator
   System.out.println("\n===3. Using Iterator===");
   Iterator<Entry<String, String>> iterator = map.entrySet().iterator();
   while (iterator.hasNext()) {
     Entry<String, String> entry = iterator.next();
     System.out.println(entry.getKey() + " >> " + entry.getValue());
   }

   // Way 4: Using Map's Value (Iterators only Values in the Map)
   System.out.println("\n===4. Using Map's Values===");
   Collection<String> collection = map.values();
   Iterator<String> itr = collection.iterator();
   while (itr.hasNext()) {
     System.out.println(itr.next());
   }
 }
}

OUTPUT


===1. Using Map's EntrySet===
5000 >> Rekha
3000 >> Bala
4000 >> Kumar
1000 >> Ranjith
2000 >> Sekar

===2. Using Map's KeySet===
5000 >> Rekha
3000 >> Bala
4000 >> Kumar
1000 >> Ranjith
2000 >> Sekar

===3. Using Iterator===
5000 >> Rekha
3000 >> Bala
4000 >> Kumar
1000 >> Ranjith
2000 >> Sekar

===4. Using Map's Values===
Rekha
Bala
Kumar
Ranjith
Sekar

Friday, June 5, 2015

PHP with MySQL Database Example

INTRODUCTION

  • PHP is the acronym of Hypertext Preprocessor and also called Personal Home Page.
  • It is one of the server side scripting language which is mainly used Web Projects.
  • It is an open-source software used in many organizations.
  • An interpreter called “Zend Engine is also a free software.
  • The PHP codes can be embedded to HTML or HTML5 codes.
  • The syntax starts with <?php and ends with ?>
  • It supports object oriented programming.
In this post, we are going to learn how to connect MySQL using PHP and display data.

TOOLS & TECHNOLOGIES

  1. Eclipse Mars.2 with PHP Plugin
  2. WAMPSERVER 2.5
  3. MySQL 5

SETUP

  1. Open the \wamp\bin\apache\apache2.4.9\conf\httpd.conf file and update the port 8086.
Listen 0.0.0.0:8086
Listen [::0]:8086
  1. Start the WAMPSERVER and enter the URL http://localhost:8086/phpmyadmin/  in browser to check whether the server installed properly or not.

Follow the below steps to retrieve the data from MySQL using PHP.


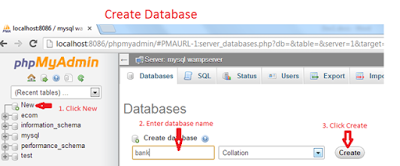
Step 1 - Create a Database


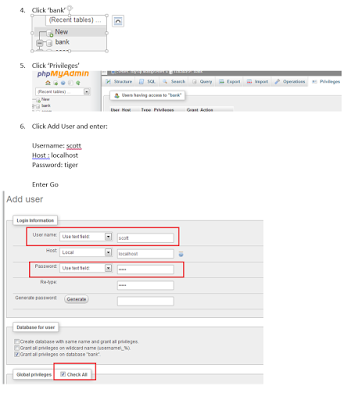
Step 2 - Create a New User

Step 3 - Create a Table in MySQL

Create Query
CREATE TABLE IF NOT EXISTS `employee` (
 `empid` int(30) NOT NULL,
 `empname` varchar(30) NOT NULL,
 `address` varchar(40) NOT NULL
)

Insert Query
INSERT INTO `employee` (`empid`, `empname`, `address`) VALUES
(100, 'Ranjith', 'Chennai'),
(200, 'Bala', 'Bangalore'),
(300, 'Anbu', 'Delhi');

Step 4 -Create a PHP Project & a PHP File


Step 5 - Develop PHP Code to connect MySQL

EmployeeInfo.php
<?php
$dbUsername='scott';
$dbPassword='tiger';
$dbHost='localhost';
$databaseName='bank';

$connection = mysqli_connect($dbHost,$dbUsername,$dbPassword,$databaseName);

if($connection){
$query = "select * from employee";
$result = $connection->query($query);

if($result->num_rows >0){
while ($row = $result->fetch_assoc()) {
echo '<br> <b>Employee ID: </b>' . $row['empid'];
echo '<br> <b>Employee Name: </b>' .  $row['empname'];
echo  '<br> <b>Employee Address: </b>' . $row['address'];
echo  '<br>';
echo  '<br>';
}
}

}else{
die('Connection Error...' . mysqli_connect_error());
}

Step 6 - Run the Application

Right click the EmployeeInfo.php file in Eclipse and Run As 'PHP Web Application'.
In the URL, there is no port number displayed so it won't launch the application. Make below changes to overcome this issue.
Go to Preferences->PHP->PHP Servers->Edit->
Now again Run. The URL will be populated as http://localhost:8086//EmpInfo/EmployeeInfo.php

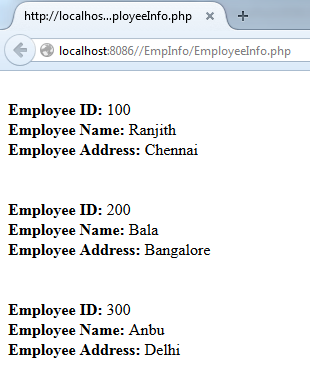
OUTPUT


Tuesday, March 3, 2015

[SOLVED] ORA-01439: column to be modified must be empty to change datatype

ISSUE

ORA-01439: column to be modified must be empty to change datatype

REASON

This error may occur on below cases.

1. modify the data type for the LONG column
2. renaming the LONG column name

Tuesday, February 10, 2015

[SOLVED] /httpd.conf: ServerRoot must be a valid directory

ERROR

httpd.conf: ServerRoot must be a valid directory

REASON

Actual apache server installation path not set properly.

SOLUTION

  1. Open the file httpd.conf from the apache zip extracted path, say: c:\ranjith\softies\httpd-2.4.12-x86\Apache24
  2. Change the Define SRVROOT "/Apache24"
into
Define SRVROOT "c:/ranjith/softies/httpd-2.4.12-x86/Apache24"

How to install apache http server in windows 7

Below steps can help to install and run the apache http server in windows7.


Step 1

download the latest apache http server version @ http://httpd.apache.org/download.cgi


Step 2

  • unzip the file httpd-2.4.12-x86.zip (default path would be "c:/Apache24")  

  • if you want to extract into some other folder like "c:\ranjith\softies\"

  • Change this location in httpd.conf file also (Define SRVROOT "ranjith/softies/Apache24")


Step 3

Open the command prompt (run as administrator) and execute the below command:

cd c:/ranjith/softies/Apache24


Step 4

Install apache server by executing below command:

httpd -k install


Step 5

Start apache server using below command:

httpd -k start


how to set java classpath for windows

This post is a step by step guide to set JAVA Classpath & Path in Windows.

Step 1

Go to Control Panel

Step 2

Click User Accounts -> User Accounts

Step 3

Click 'Change my environment Variables'
   There are two types:
  1. User variable,
  2. System variables (should login as admin user).

Step 4

Click New to add a new environmental variable.

Step 5

Set java home
   Variable Name: JAVA_HOME
   Variable Value: c:\Program Files\Java\jdk1.7.0_60

Step 6

Set classpath
   Variable Name: CLASSPATH
   Variable Value:
       c:\Program Files\Java\jdk1.7.0_60\lib;
       (OR) %JAVA_HOME%\lib;

Step 7

Set path
   Variable Name: PATH
   Variable Value:
       c:\Program Files\Java\jdk1.7.0_60\bin;
       (OR) %JAVA_HOME%\bin;

Note

1. classpath should always point the 'lib' folder
2. path should always point 'bin' folder

Test

To make sure whether the java path & classpath are properly set, type 'javac' & 'java' in command prompt.

[SOLVED] ORA-28001: the password has expired

ISSUE

ORA-28001: the password has expired

REASON

This error may occur if the password the for user expired.

SOLUTION

1. Login as sysdba user
2. Enter the below SQL Command
ALTER USER username IDENTIFIED BY password;

Monday, February 2, 2015

[SOLVED] SQL Error: ORA-00997: illegal use of LONG datatype


ISSUE

SQL Error: ORA-00997: illegal use of LONG datatype

SOLUTION

Consider I have a table with values as below and need to copy the values to another table.
create table test (name varchar2(30), id long);

insert into test values('ranjith', 24);
insert into test values('sekar', 25);

I was facing this error when I was trying to copy data from one table to another like below.
create table test_temp as select * from test;

Got the error
SQL Error: ORA-00997: illegal use of LONG datatype
00997. 00000 -  "illegal use of LONG datatype"

Follow below steps to resolve this error.

STEP 1

Create another temp table with CLOB column as below.
create table test_temp (name varchar2(30), id clob);

STEP 2

Copy the values to temp table from actual table.
insert into test_temp select name, to_lob(id) from test;

STEP 3

Now, truncate the actual table since we have copied all the data into temp table safely. Please double check if required.
truncate table test;

STEP 4

Copy the values back to the actual table from temp table.
insert into test select * from test_temp;

STEP 5

Drop the temp table.
drop table test_temp;