Tuesday, April 18, 2017

Composite Design Pattern in Java

INTRODUCTION

  • The Composite Design pattern is categorized under Structural Patterns.
  • It helps to traverse the Tree Structured object and perform the operations on it. In the tree structure, a node which contains no child called Leaf Object and a node which contains at least one child called Composite Object.
  • The client will treat both composite object and simple object as same. Example, double clicking the folder and file will be same but the operation performed in different Objects.
  • In this pattern, accessing of an object’s behavior follows the recursion principle if it contains multiple children.

EXAMPLE

Following are the examples from Java API.
  1. add(Component comp) method of java.awt.Container class.
  2. In Collection Framework
    1. addAll(Collection<? extends E> c) method of java.util.List interface.
    2. addAll(Collection<? extends E> c) method of java.util.Set interface.
    3. putAll(Map<? extends K,? extends V> m) method of java.util.Map interface.

WHEN TO USE?

The composite design pattern can be used when
  1. You want to handle the part-whole hierarchies of the object, i.e an objects which may have children or without children (tree-structured objects). part denotes the individual object and whole denotes the composite object.
  2. If the client didn’t want to know the difference between the composite object and simple object.

USECASE

Assembling the car. A Car will consist multiple components and those components may be an individual component or again it may be assembled with multiple individual components.
Car assembling may have below processes.
  1. Assembling Engine
  2. Assembling Body - It may have sub-processes like
  1. Assembling Front Body
  2. Assembling Center Body
  3. Assembling Back Body
  1. Assembling Wheel - It may have sub-processes like
  1. Assembling Tyre
  2. Assembling Chassis
Below the tree representation of whole assembling process.
Leaf Objects - Engine, Front, Center, Back, Tyre and Chassis
Composite Objects - Car, Body, and Wheel

ENTITIES

Composite Design pattern contains the following entities.
  1. Component - It is an interface consist of all the functionality of the both composite and simple objects.
  2. Composite - Composite represents an object which should have at least one child object. It also performs the child operations so that when a composite object is accessed, it also gives the result of all it’s children.
  3. Leaf - Leaf represents an object which has zero children.
  4. Client - who will access the Component and manipulates the Composite object or individual object

IMPLEMENTATION

Define Component

First, create an interface(CarComponent.java)which represents the Component Object.
public interface CarComponent {
 String getName();

 long getPrice();

 void assembly();

 void addComponent(CarComponent component);

 void removeComponent(CarComponent component);
}

Implement the Leaf Object

A Leaf object is the one has no children for it. So create a class (Engine.java) which will implement all the components behaviors.
public class Engine implements CarComponent {

 @Override
 public String getName() {
   return "Engine";
 }

 @Override
 public long getPrice() {
   return 50000;
 }

 @Override
 public void assembly() {
   System.out.println("Engine - Assembly DONE");
 }

 @Override
 public void addComponent(CarComponent component) {
   // no components to add
 }

 @Override
 public void removeComponent(CarComponent component) {
   // no components to remove
 }

}

Implement the Composite Object

In the above example, the assembling of wheel contains the subprocess, so create another class (Wheel.java) which represents the Composite object and also has the child operations.
import java.util.ArrayList;
import java.util.List;

public class Wheel implements CarComponent {

 private List<CarComponent> wheelComponents = new ArrayList<>();

 public Wheel() {
   this.addComponent(new Tyre());
   this.addComponent(new Chassis());
 }

 @Override
 public String getName() {
   return "Wheel";
 }

 @Override
 public long getPrice() {
   long price = 0;

   for (CarComponent component : wheelComponents) {
     System.out.println(component.getName() + " Price " + component.getPrice());
     price = price + component.getPrice();
   }

   return price;
 }

 @Override
 public void assembly() {
   for (CarComponent component : wheelComponents) {
     component.assembly();
     System.out.println(component.getName() + " - Assembly DONE");
   }

   System.out.println("Wheel - Assembly DONE");
 }

 @Override
 public void addComponent(CarComponent component) {
   this.wheelComponents.add(component);
 }

 @Override
 public void removeComponent(CarComponent component) {
   // no components to remove
 }

}

Here, getPrice() & assembly() methods contains the child operations. So it produces the final result of all the children operations.

Now, implement the children objects, child 1 (Tyre.java) & child 2 (Chassis.java) has no children.
public class Tyre implements CarComponent {

 @Override
 public String getName() {
   return "Tyre";
 }

 @Override
 public long getPrice() {
   return 20000;
 }

 @Override
 public void assembly() {
   // no assembly operation here
 }

 @Override
 public void addComponent(CarComponent component) {
   // no components to add
 }

 @Override
 public void removeComponent(CarComponent component) {
   // no components to remove
 }

}

Now create a Client(CompositePatternClient.java) which will access the Component and also performs the operations on either Composite Object or Individual Object.
public class CompositePatternClient {

 public static void main(String[] args) {
   Engine engine = new Engine();
   Wheel wheel = new Wheel();

   System.out.println("...Car Assembly...");
   engine.assembly();
   wheel.assembly();

   System.out.println("\n...Car Price...");
   long enginePrice = engine.getPrice();
   long wheelPrice = wheel.getPrice();
   System.out.println("Wheel Price(Tyre + Chassis): " + wheelPrice);
   System.out.println("Engine Price: " + enginePrice);
   System.out.println("Total Price: " + (enginePrice + wheelPrice));
 }
}

OUTPUT


...Car Assembly...
Engine - Assembly DONE
Tyre - Assembly DONE
Chassis - Assembly DONE
Wheel - Assembly DONE

...Car Price...
Tyre Price 20000
Chassis Price 30000
Wheel Price(Tyre + Chassis): 50000
Engine Price: 50000
Total Price: 100000
Hope this example clarifies the Composite Design Pattern. Please share your comments and suggestions below.
Happy Knowledge Sharing!!!

Monday, April 17, 2017

How to install Papyrus plugin in Eclipse Mars

INTRODUCTION

  • Papyrus is a UML tool which will help the developers to create UML Diagrams like Class Diagram, Use case diagram, Sequence Diagram, etc.,
  • It provides a plugin for easy UML Diagram creation in Eclipse IDE.
  • It is an Open Source Tool.
  • It can be used as standalone or as a plugin for Eclipse IDE.
  • You can find more details on below links:
This post is a step by step guide to help you to install Papyrus Plugin in Eclipse Mars.2 IDE

Install Papyrus Plugin

  1. Open the eclipse and go to Help->Install New Software
  2. Enter the URL (http://download.eclipse.org/releases/mars) in “Work with” Text box and wait to load all the available plugins.
  3. Once loaded, type “papyrus” in “type filter text” text box.
  1. Click Next and “Review the items to be installed.” if you want.
  2. Click Next and select the radio button “ I accept the terms of the license agreement”.
  3. Finally, Click Finish
The plugin will be installing
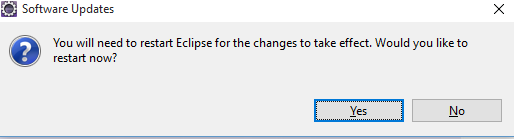
  1. Once the above step complete, you will be asked to restart the eclipse. Please restart.
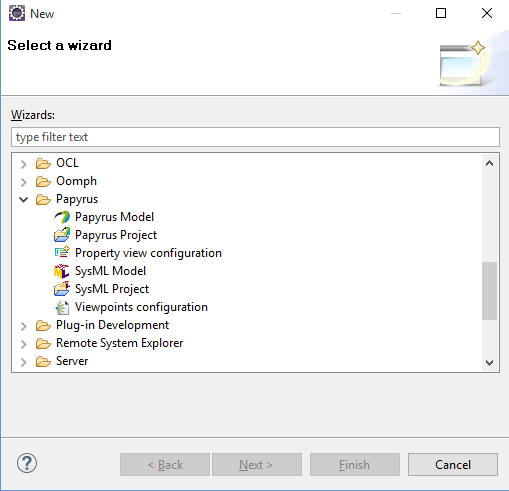
  1. To check whether the papyrus plugin installed properly, go to File->New->Other->Papyrus (Expand it)
Now papyrus plugin installed successfully and ready to create UML Diagrams. We will see how to create various type of UML Diagrams using papyrus in Eclipse in future posts.

Install UML 2 Plugin

If you want to generate the Java code from the UML Class Diagram which is created using Papyrus Plugin, then you should also install the UML 2 Plugin. Follow the below steps.
  1. Open the eclipse and go to Help->Install New Software
  2. Enter the URL (http://download.eclipse.org/releases/mars) in “Work with” Textbox and wait to load all the available plugins.
  3. Once loaded, type “UML2” in “type filter text” text box.
  4. Select the latest version of UML2 Extender SDK.
  1. Click Next
  2. Click Next and select the radio button “ I accept the terms of the license agreement”.
  3. Finally, Click Finish
  4. Once plugin installed, you will be asked to restart the eclipse, please restart.
  5. To check whether the plugin installed properly, click File->New->Other
  6. Type “UML” in Wizards: text box
Hope this post will help to install papyrus plugin & UML 2 plugin for Eclipse Mars.2
Please share your comments.

Happy Knowledge Sharing!!!

Thursday, April 6, 2017

Strategy Design Pattern in Java

INTRODUCTION
The strategy design pattern will choose the different algorithms or implementations dynamically. We may have different strategies for a requirement, but dynamically it can be accessed based on the need.  In the real world, a different person will have a different solution for the same problem, but based on the need anyone of the solution will be utilized.
USECASE
Assembling different types of vehicles.

IMPLEMENTATION
PROBLEM
Consider we want to assemble the bike based on the type client wants. The possible implementation would be below
  1. package jbr.strategypattern.problem;  
  2.   
  3. import jbr.common.VehicleType;  
  4. import jbr.common.model.Vehicle;  
  5.   
  6. public class AssembleVehicle {  
  7.   
  8.   public static void main(String[] args) {  
  9.     Vehicle car = assemble(VehicleType.CAR);  
  10.     System.out.println(car.getVehicleType());  
  11.   }  
  12.   
  13.   public static Vehicle assemble(VehicleType vehicleType) {  
  14.     Vehicle vehicle = null;  
  15.     switch (vehicleType) {  
  16.     case CAR:  
  17.       vehicle = new Vehicle(4"honda", VehicleType.CAR, 100000);  
  18.       break;  
  19.     case BIKE:  
  20.       vehicle = new Vehicle(2"hero", VehicleType.BIKE, 300000);  
  21.       break;  
  22.     case BUS:  
  23.       vehicle = new Vehicle(4"ashok leyland", VehicleType.BUS, 1300000);  
  24.       break;  
  25.     default:  
  26.       break;  
  27.     // add implementations for new type of vehicles  
  28.     }  
  29.   
  30.     return vehicle;  
  31.   }  
  32. }  

SOLUTION
The issue with the above code is, it is not easily maintainable. We need to alter a lot of code if any new strategy needs to be added in future. The solution would be below.
Create an Enum for the different type of vehicles.
  1. package jbr.common;  
  2.   
  3. public enum VehicleType {  
  4.   CAR, BIKE, BUS;  
  5. }  
Create a model for Vehicle.
  1. public class Vehicle {    
  2.   private int noOfWheels;    
  3.   private String manufacturer;    
  4.   private VehicleType vehicleType;    
  5.   private int price;    
  6.       
  7.   //constructor    
  8.   //getters and setters    
  9. }   
Create a strategy (interface) for bike assembling.
  1. package jbr.strategypattern.solution;  
  2.   
  3. import jbr.common.model.Vehicle;  
  4.   
  5. public interface Assembler {  
  6.   
  7.   Vehicle assemble();  
  8. }  
Now create separate strategies for Car, Bike and Bus.
Car assembling strategy.
  1. package jbr.strategypattern.solution;  
  2.   
  3. import jbr.common.VehicleType;  
  4. import jbr.common.model.Vehicle;  
  5.   
  6. public class CarAssembler implements Assembler {  
  7.   
  8.   @Override  
  9.   public Vehicle assemble() {  
  10.     return new Vehicle(4"honda", VehicleType.CAR, 100000);  
  11.   }  
  12. }  

Bike assembling strategy.
  1. package jbr.strategypattern.solution;  
  2.   
  3. import jbr.common.VehicleType;  
  4. import jbr.common.model.Vehicle;  
  5.   
  6. public class BikeAssembler implements Assembler {  
  7.   
  8.   @Override  
  9.   public Vehicle assemble() {  
  10.     return new Vehicle(2"hero", VehicleType.BIKE, 300000);  
  11.   }  
  12. }  

Bus assembling strategy.
  1. package jbr.strategypattern.solution;  
  2.   
  3. import jbr.common.VehicleType;  
  4. import jbr.common.model.Vehicle;  
  5.   
  6. public class BusAssembler implements Assembler {  
  7.   
  8.   @Override  
  9.   public Vehicle assemble() {  
  10.     return new Vehicle(4"ashok leyland", VehicleType.BUS, 1300000);  
  11.   }  
  12. }  
Now create a client which accepts different strategies dynamically based on the need of the client.
  1. package jbr.strategypattern.solution;  
  2.   
  3. import jbr.common.VehicleType;  
  4. import jbr.common.model.Vehicle;  
  5.   
  6. public class MyVehicle {  
  7.   
  8.   public static void main(String[] args) {  
  9.     Vehicle car = assemble(VehicleType.CAR);  
  10.     System.out.println(car.getVehicleType());  
  11.   }  
  12.   
  13.   public static Vehicle assemble(VehicleType vehicleType) {  
  14.     CarAssembler carAssembler = new CarAssembler();  
  15.     BikeAssembler bikeAssembler = new BikeAssembler();  
  16.     Vehicle vehicle = null;  
  17.   
  18.     switch (vehicleType) {  
  19.     case CAR:  
  20.       vehicle = carAssembler.assemble();  
  21.       break;  
  22.     case BIKE:  
  23.       vehicle = bikeAssembler.assemble();  
  24.       break;  
  25.     default:  
  26.       break;  
  27.     // add implementations for new type of vehicles  
  28.     }  
  29.   
  30.     return vehicle;  
  31.   }  
  32.   
  33. }  

Still we have all the logic to call the different strategies into the client code itself, now we will try to enhance our client code lighter by creating a factory for assembling different vehicles based on the type.
Create a factory.
  1. package jbr.strategypattern.solution;  
  2.   
  3. import jbr.common.VehicleType;  
  4.   
  5. public class AssemblerFactory {  
  6.   
  7.   public static Assembler assemble(VehicleType vehicleType) {  
  8.     switch (vehicleType) {  
  9.     case CAR:  
  10.       return new CarAssembler();  
  11.     case BIKE:  
  12.       return new BikeAssembler();  
  13.     case BUS:  
  14.       return new BusAssembler();  
  15.     default:a  
  16.       break;  
  17.     }  
  18.   
  19.     return null;  
  20.   }  
  21. }  

Now our enhanced client code will be.
  1. package jbr.strategypattern.solution;  
  2.   
  3. import jbr.common.VehicleType;  
  4. import jbr.common.model.Vehicle;  
  5.   
  6. public class MyVehicleEnhanced {  
  7.   
  8.   public static void main(String[] args) {  
  9.     Vehicle vehicle = assemble(VehicleType.CAR);  
  10.     System.out.println(vehicle.toString());  
  11.   
  12.     vehicle = assemble(VehicleType.BIKE);  
  13.     System.out.println("\n" + vehicle.toString());  
  14.   
  15.     vehicle = assemble(VehicleType.BUS);  
  16.     System.out.println("\n" + vehicle.toString());  
  17.   
  18.   }  
  19.   
  20.   public static Vehicle assemble(VehicleType vehicleType) {  
  21.     return AssemblerFactory.assemble(vehicleType)  
  22.         .assemble();  
  23.   }  
  24. }  

OUTPUT

Type: CAR
No Of Wheels: 4
Manufacturer: honda
Price: 100000

Type: BIKE
No Of Wheels: 2
Manufacturer: hero
Price: 300000

Type: BUS
No Of Wheels: 4
Manufacturer: ashok leyland
Price: 1300000

Hope this example clarifies the Strategy Design Pattern. Please share your thoughts in comment box.
Happy Knowledge Sharing!!!